![]() When you share a file publicly, you can configure any restrictions and specify which users have access.
When you share a file publicly, you can configure any restrictions and specify which users have access.
You can configure share options when:
- You first create the Share using Advanced Options - after you right-click a file in the File Browser window and select Share, this button is available on the pop-up window with the Share link
- After you create the share using Manage Share - after you right-click a file that is already being shared in the File Browser window, and select then Share again, the Manage Share window opens
To create a share or manage it, you will always select the Share option from the right-click menu. Even if the file is already being shared, to access the Manage Share window you must select the Share option again.
The Manage Share window contains buttons to perform the following actions:
|
|---|
|

The Manage Share window also contains two panels for configuring access.
| SHARE OPTIONS panel | SHARE PERMISSIONS panel |
|---|---|
|
|
What Do You Want to Do?
![]() Click on a topic to expand it.
Click on a topic to expand it.
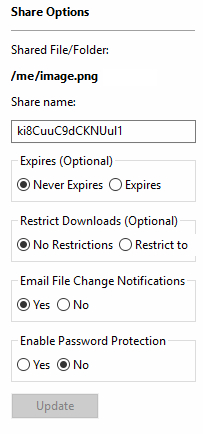
In the Manage Share for file window, you can set the following SHARED OPTIONS:
| Option | Settings | Description |
|---|---|---|
| Share File/Folder | current location of the file | Although you can type in this field and click Update, you cannot change the folder path here. To change the location of the file, right-click and select Move. |
| Share Name | a randomly-generated name | |
| Expires |
| By default, this is set to Never Expires. If set to Expires, identifies a date in the future when this file is no longer shared. When a share expires, the link only becomes unusable to other users. The file is not removed or changed when the sharing link expires. |
| Restrict Downloads |
|
|
| Email File Change Notifications |
| By default, this is set to YES.
|
| Enable Password Protection |
| By default, this is set to NO. If set to YES, then a user who wants to access this file must provide a password first. When you share this link through the FileCloud email template, the password information will be given. |
To configure how a file is shared:
- In the system tray, right-click the FileCloud Sync icon (
 ) and select File Browser.
 - In the File Browser window, right-click the file and then select Share.
- On the Share link pop-up window, click Advanced Options.
- On the Manage Share for file window, in Share Options, to set a date when you want to stop sharing the file, select Expires and then either select a date using the calendar icon or type in a future date.
- If you want to restrict the number of times a file can be downloaded, select Restrict To and then type in a number greater than 0.
- To disable sending an email notification when a file is opened or downloaded, in Email File Change Notifications, select No.
- To require a user to enter a password before accessing the file, in Enable Password Protection, select YES. You can either use the randomly generated password or type in one of your own.
- To save your changes, click Update.
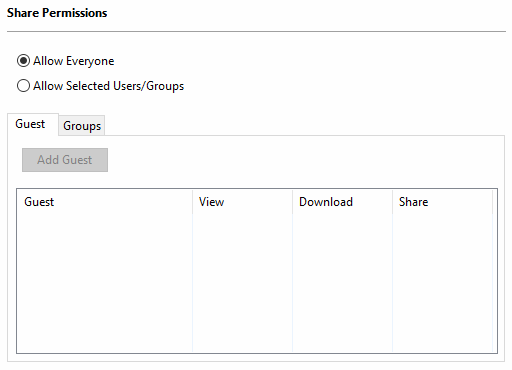
In the Manage Share window, you can configure who can access the file in the SHARE PERMISSIONS panel.
![]() For public sharing, select Allow Everyone. If you want more security, you can use the SHARE OPTIONS panel to set a password.
For public sharing, select Allow Everyone. If you want more security, you can use the SHARE OPTIONS panel to set a password.
To configure public file sharing with everyone:
- In the system tray, right-click the FileCloud Sync icon () and select File Browser.
- In the File Browser window, right-click the file and then select Share.
- On the Share link pop-up window, click Advanced Options.
- On the Manage Share for file window, in the Share Permissions panel, select Allow Everyone.
- To require a user to enter a password before accessing the file, in the Share Options panel, in Enable Password Protection, select YES.
- You can either use the randomly generated password or type in one of your own.
- To save your changes, click Update.