![]() You can share a folder with a user who does not have a FileCloud account yet but wants one.
You can share a folder with a user who does not have a FileCloud account yet but wants one.
This is called a Private share because:
- You are only allowing users with a FileCloud account to access your folder and all its contents.
When you invite a new user to share your folder and all its contents, the following process occurs:
- You share a folder and invite a new user to create a FileCloud account.
- You need to know their email address, add them as a Guest, and then send them an email with the link to create an account.
- The user you have invited uses the link to create their own FileCloud account.
- After the new user signs in, they have a Full Access FileCloud account.
- The new user can access the folder and all its contents. Their ability to manage the folder and its contents is determined by the permissions you set.
An account with Full Access has its own private cloud storage space in the "My Files" area.
These users can:
- store files in their own private cloud storage space
- view/download files stored in their storage space
- view/download files shared with them by other user accounts
That means when you privately share a file, you can leave the default settings in:
SHARE OPTIONS
- Expires = Never Expires
- Restrict Downloads = No Restrictions. This allows any user to download a file an unlimited number of times.
- Email File Change Notifications = YES. This sends an email notification when a file is opened or downloaded for a public share.
- Enable Password Protection = NO. This allows a user to access a file without first providing a password.
However, you must make changes in:
SHARE PERMISSIONS
- Allow Selected Users/Groups = selected. This allows you to specify who you want to invite to create a FileCloud account so that they can access your folder and all its contents.
After you select a new user to invite, you can set permissions.
Table 1. Permission options for private folder sharing
Permission | Description |
|---|---|
| Allow View | Read access will allow users to view, or browse files in the folder. Removing view access will remove the user from the share completely. |
| Allow Download | This will allow the user to save a file from the FileCloud folder to a local device such as a desktop or cell phone. |
| Allow Upload | This will allow the user to:
|
| Allow Share | This will allow the user to shared the folder contents again with others of their choosing. Sharing access can be provided only if View and Upload access are already provided. |
| Allow Sync | Sync access will allow users to synchronize the contents of the shares using their FileCloud Sync app. Note: This option is only available for Shared Folders only. Individual files cannot be synced to other users. |
| Misc. | Allow Delete This will allow users to delete a file from the folder. Notes:
|
To share a folder and its contents with a new FileCloud user:
- Open a browser and log in to the User Portal.
- In the User Portal, click My Files.
- Select the folder you want to share.
- If the folder is already being shared, in the Details pane on the right, in the Sharing section, click Manage, and then skip to step 8.
- If the folder is not yet being shared, in the Details pane on the right, in the Sharing section, click +Share.
- On the Confirm dialog box, click OK.
- In the Share Link dialog box, click Advanced Options.
- On the Manage Share dialog box, in Share Permissions, select Allow Selected Users/Groups.
- To invite a new user, select the Guest tab, and then click Add Guest.
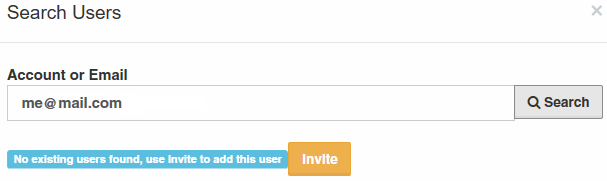
- In the Search Users dialog box, type in the user's email address, and then click Search.
- You will see a message telling you no user was found.
- In the Search dialog box, click Invite.
- In the Share Notification Email dialog, you can edit the contents of the email and then click Send.
- You will see a message about the Email Status. Read it and then click Close.
- On the Manage Share dialog box, in Share Permissions, select the guest you just added.
- To set permissions, check any of the following options: Allow View, Allow Download, Allow Upload, Allow Share, Allow Sync, Misc.
- To save your changes, click Update.