Allow Users to Create and Approve Accounts
Administrators can customize how new user accounts are created.
In this scenario you are allowing users to create and approve their own accounts.
- An administrator sets a default level of access.
- Can be used when Share invitations are sent to new users.
This scenario does not work for AD and LDAP users. Refer to the specific scenarios and settings for AD and LDAP users.
![]() Allow user access/new account creation with an AD or LDAP account.
Allow user access/new account creation with an AD or LDAP account.
The settings that you use to configure these scenarios are described in Table 1.
| Setting | Options | Description |
|---|---|---|
| New Account | ENABLED = opens a window for the user to type in new account information. DISABLED = opens a window explaining that User Account Creation is not allowed. | This setting determines the behavior of the New Account button on the User Portal Login page. If enabled, this setting works with two other settings to determine authentication and approval permissions:
|
| Allow Account Signups | Specifies if a user can or cannot create a new FileCloud user account by choosing:
Can Create an Account Prerequisite: New Account = Enabled DEFAULT = Local user authentication is allowed
TRUE = Local user can create their own account
Cannot Create an Account FALSE = Local user cannot create their own account
| This setting controls if the user can create a new account. By default, the account is disabled until an administrator approves it. If you want the account to be automatically approved, use the Automatic Account Approval settings. Do I choose DEFAULT or TRUE? DEFAULT
TRUE
|
| Automatic Account Approval | (Default) 0 = The account created by the user is DISABLED by default. It requires Admin approval to assign FULL or GUEST access to the account. 1 = The new user account is automatically approved with FULL access. 2 = The new user account is automatically approved with GUEST access. 3 = The new user account is automatically approved with EXTERNAL access. | Prerequisites:
This setting works with the Allow Account Signups setting to determine:
|
The scenarios where a user can create a new FileCloud account are described in Table 2.
Users can create their own accounts Users can approve their own accounts
|
|---|
|
Settings option, Users tab
Settings option, Authentication tab
Customization settings, Login tab
Settings option, Admin tab
Set the Create account on new user shares to true under policies. |
To configure these settings:
- Log into the Admin Portal.
- From the left navigation menu, click Settings.
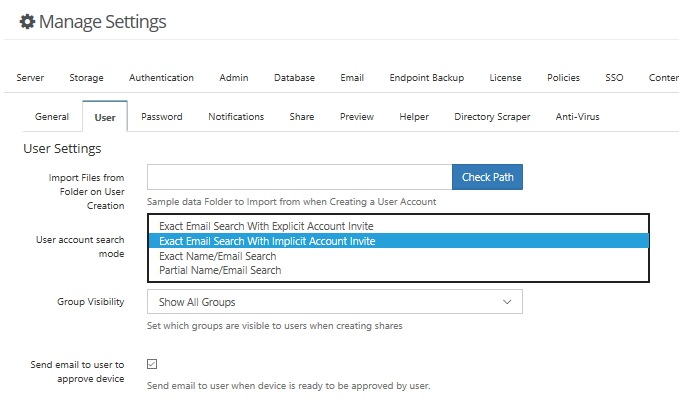
- Select the Misc. tab, and then click the Users sub-tab.
- In User Account Search Mode, select Exact Email Search with Explicit Account Invite or Exact Email Search with Implicit Account Invite.
- Click Save.
- In the left menu panel, click Customization.
- On the General tab, click the Login tab.
- Select the Show New Account Button checkbox.
- Click Save.
- From the left navigation menu, click Settings.
- In the right panel, click the Admin tab.
- In the Allow Account Signups field, select TRUE.
- Click Save.