Setting up FileCloud Managed Azure Blob Storage

As an administrator, you can integrate FileCloud Server to store user data on an Azure Blob storage server.

  • Azure Blob storage (Blob Storage) is a massively scalable object storage service for unstructured data
  • You can use Blob Storage to store and retrieve any amount of data at any time, from anywhere on the web
  • You can accomplish these tasks using the Azure Console

Getting Started with Azure Blob Storage


WARNINGS:

  • Only change the FileCloud storage type to Blob for new installations.
  • Do not change the FileCloud storage type to Blob if FileCloud has been in use and data is already stored.
  • Be very careful when changing the storage path. If done improperly, it could lead to data loss. 
  • When changing the storage type from local to Azure Blob, the files and folders that have already been saved to local storage will not be moved automatically to Blob storage.
    • For existing files and folders, the administrator must manually export them from local storage before changing the storage type.
    • After changing the storage type to Blob, the administrator must manually import pre-existing files and folders.
  • The Azure Storage Container should NEVER be modified outside of the FileCloud subsystem.
  • Do not add/edit/modify files directly using Azure Storage tools. Doing so will destabilize your FileCloud installation.


Integrate Azure Blob Storage


NOTE:

For this step you will need to access WWWROOT. It is typically located at: 

Windows

Linux

(later than Ubuntu 14.04)

Linux

(earlier than Ubuntu 14.04)

c:\xampp\htdocs/var/www/html/var/www

To enable Azure Blob storage as the backend:

  1.  To make sure that your server does not have any time variations, set up the time on your server to be synchronized.
    1. Configure an authoritative time server in Windows Server
    2. Synchronize Time with NTP in Linux
  2. Open the following file for editing:

    WWWROOT/config/cloudconfig.php

  3. Find the following line:

    define("TONIDOCLOUD_STORAGE_IMPLEMENTATION", "local");

  4. Change it to:

    define("TONIDOCLOUD_STORAGE_IMPLEMENTATION", "azureblob");

  5. Save and close the file.

  6. Find the following file: 

    WWWROOT/config/azureblobstorageconfig-sample.php

  7. Rename it to:

    WWWROOT/config/azureblobstorageconfig.php

(lightbulb) Nothing needs to be added or edited in azureblobstorageconfig.php

After you have set up the storage implementation key in step 1, you can configure the following credentials:

Field

Description

Account Name
This is your Azure storage account name. For an RBAC user, it requires at least the following permissions
Account Key
This is your Azure storage account key (To get your account key, visit Amazon security portal). For an RBAC user, it requires at least the following permissions.
Container Name

Provide a storage container name.

The container should be new (in some circumstances, containers previously used in FileCloud could be used).

It is very important that the Azure storage container is never modified outside of the FileCloud subsystem.

Container name rules

  • The name of the container has to be unique and follow the naming rules.
  • If container name is not provided, FileCloud will auto-generate it when setting up the storage.
  • Container name cannot be changed once storage is set up.
Endpoint Suffix

Optional: This is the Azure Blob storage endpoint.

  • Use this to specify your own Azure storage endpoint (typically Azure-compatible storage)
  • Use this if it is an unpublished region.

To use an Azure endpoint, it must be one of the values published here.

  • Note: For govcloud installs, you must use the following endpoint suffix: blob.core.usgovcloudapi.net
Blob Storage Folder

Optional: All files will be stored inside this root storage folder.

  • This folder will be created automatically.

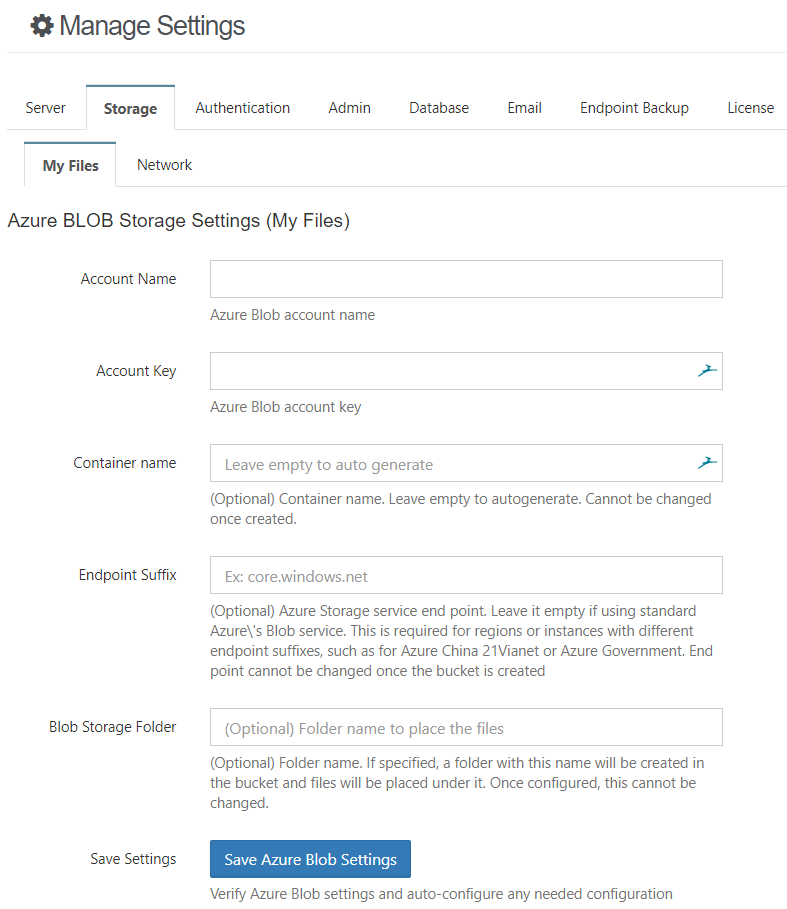
To configure Azure Blob storage Credentials:

  1. Open a browser and log into the admin portal.
  2. Go to Settings > Storage
  3. Type in or select the settings for your environment.
  4. Click Save.

Encryption at rest

Azure Storage automatically encrypts your data when persisting it to the cloud. Encryption protects your data and helps you meet your organizational security and compliance commitments. Data in Azure Storage is encrypted and decrypted transparently using 256-bit AES encryption, one of the strongest block ciphers available, and is FIPS 140-2 compliant. Azure Storage encryption is similar to BitLocker encryption on Windows.

Azure Storage encryption is enabled for all new and existing storage accounts and cannot be disabled. Because your data is secured by default, you don't need to modify your code or applications to take advantage of Azure Storage encryption.

Storage accounts are encrypted regardless of their performance tier (standard or premium) or deployment model (Azure Resource Manager or classic). All Azure Storage redundancy options support encryption, and all copies of a storage account are encrypted. All Azure Storage resources are encrypted, including blobs, disks, files, queues, and tables. All object metadata is also encrypted.

Encryption does not affect Azure Storage performance. There is no additional cost for Azure Storage encryption.


This means that all configuration can be done in Azure Portal and no additional steps are required in FileCloud


Troubleshooting


The following keys are not typically used. However, they may be needed in specific circumstances. 

KEYVALUEDescription
TONIDOCLOUD_NODE_COMMON_TEMP_FOLDER"/somepath/location"In HA installs, temp folder must be a commonly accessible location. This key must be set in each of the HA nodes
TONIDOCLOUD_AZURE_BLOB_DOWNLOAD_SIZE_LIMIT10485760Specifies the file size limit for which file will be downloaded
TONIDOCLOUD_DISABLE_AZURE_BLOB_REDIRECT"1"(NOT RECOMMENDED) This will force filecloud server to download the file from Azure Blob storage to the filecloud server system and then send it to client on file downloads (Can be slow)

If you are having problems in previewing images, you should add a line to the .htaccess file.

To add a line to the .htaccess file:

  1. Open the following file:
    Windows:  C:\xampp\htdocs\.htaccess
    Linux: /var/www/html/.htaccess
  1. Add the following line:

    Header set Content-Security-Policy: "default-src 'self' *.live.com *.amazonaws.com *.core.windows.net; style-src 'unsafe-inline' 'self';script-src 'unsafe-inline' 'unsafe-eval' 'self';font-src 'self' data:;img-src 'self' data: *.duosecurity.com *.live.com *.amazonaws.com *.core.windows.net"