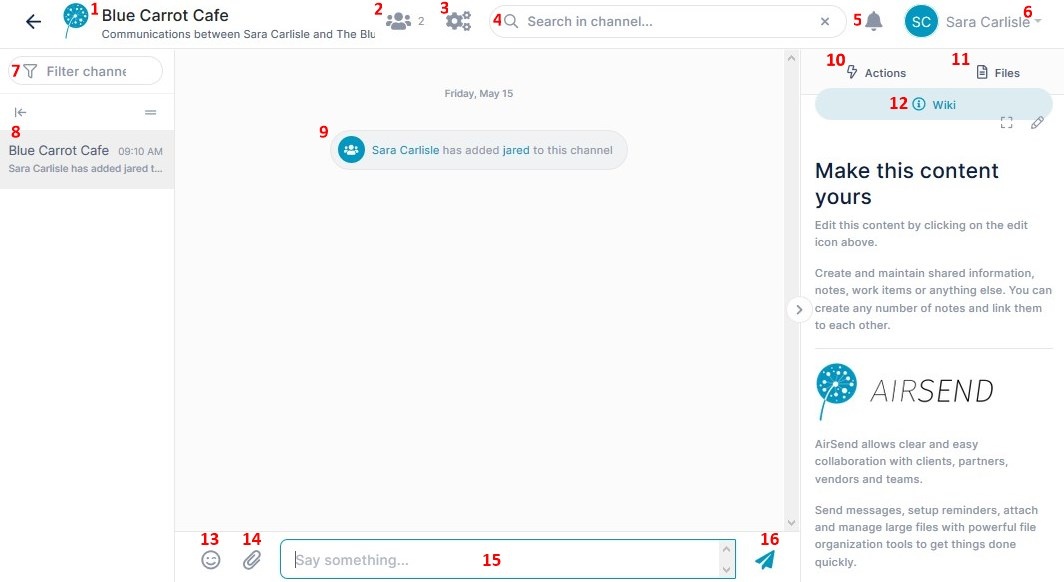
Versions Compared

Key

  • This line was added.
  • This line was removed.
  • Formatting was changed.

The AirSend channel screen

Annotated channelImage Added

  1. Go to Dashboard.
Image Removed
  1. Name of the channel.
    In this example, the channel name is
Blue Carrot Cafe.
  • Number of members of the channel. This includes the user who created the channel and all the other users they have added.
    There are 2 members in this channel, Sara Carlisle, the channel creator, and jared, a user she has added.
  • Settings. For more information, see Channel settings.
  • Search box. The channel searches through xxxxx
  • Notifications. This icon displays the number of unread notifications. See Notifications, below.
    1. User Group.
    2. Meeting. Click to start a meeting.
    3. Members. Click to see a list of members in the channel or to add new members. The number on the icon indicates the number of members including the owner.
    4. Settings. Click to see channel information and configuration opens. 
    5. Search box. Enter a search term to search through messages, channels, users, files, and actions.
    6. Notifications. Click to display recent notifications . See AirSend Dashboard for more information. The number on the icon indicates the number of unread messages.
    7. User and user settings. User signed in to the channel. Click
    The user who created the channel. Click
    1. the down arrow to see a user menu
    . For more information, see User menu, below.
  • Filter channel.
  • List of notifications.
  • Chat area. Since this is a new channel, there are no conversations yet. The chat area also displays
    1. with user settings. 
    2. Add a channel. Click to add a new channel.
    3. Add a group. Click to create a Group that includes multiple channels. See Channel Sidebar: Finding Channels for more information about adding groups.
    4. Expand/Collapse channel categories. See Channel Sidebar: Finding Channels for more information about expanding/collapsing the sidebar.
    5. Full/Compact sidebar view toggle. See Channel Sidebar: Finding Channels for more information about listing channels in the toolbar in full or compact view.
    6. Channel sidebar. List of all active channels. Lets you view and switch to other channels while a channel is open.
    7. Message section. Section that displays messages and notifications when actions occur.
    8. Actions.
    Any member of the channel can click
    1. Click this tab to view and add actions that all members of the channel can see. 
    2. Files.
    Any member of the channel can click
    1. Click this tab to attach files and access files that other users have added. 
    2. Wiki
    - A  notepad where any member of the channel can add notes that all members can see.
    1. - Click this tab to view and add important information such as instructions, updates, and frequently accessed data
    2. Emoji - Click to add an emoji to your message.
    3. Attachment icon - Click to attach a picture or file to your message. The picture or file is saved to the channel and is accessible in the Attachments folder of the Files tab in the right panel.
    4. Message input box - Type in your message here, then click Enter or the send icon.
    5. Send icon - Click to send your message and display it in the Message section